
Free Fire Maps Guide: Best Landing Spots, Loot Areas and Survival Tips for Every Map
To survive longer on any Free Fire map, pick a landing spot that matches your playstyle, loot just enough to be ready, and start moving toward the safe zone before it forces you. Lots of players lose matches in the first two minutes, either by landing on a crowded hotspot with no plan or by leaving a good position too late. This guide covers Bermuda, Bermuda 2.0, Kalahari, Purgatory, Alpine, NeXTerra and Solara, with a simple way to decide where to land on each.
Map availability changes by version, region and game mode. Check the in-game map selection and Garena’s official maps page for what you can play right now.
What Makes Each Free Fire Map Different?
Every map asks a different question. Bermuda is about buildings and tight fights. Kalahari is about open desert. Purgatory is about rivers and crossings. Alpine is about changing terrain. NeXTerra is about futuristic structures. Solara is about its slide tracks and coastal routes.
If you are new, start with Bermuda. It’s the classic map, and the lessons carry over to the others. If you want to practice moving across open ground, Kalahari is a good teacher because it punishes sloppy rotations fast.
How to Choose the Best Landing Spot in Any Free Fire Map
Before you jump, check three things.
- Flight path. Landing far from the plane's line usually means fewer players dropping near you. Landing right under it means company.
- Cover and exits. A building with only one way out is a trap when a squad arrives. Look for a spot with a second exit or nearby cover.
- Your goal. Want early fights and fast kills? Land close to the center. Want a calmer start? Land on the outer edge and loot slowly.
A rule I like: if you can’t name your exit before you land, pick another spot.
Bermuda Map Guide

Land on the outer areas if you want a safer start, and learn two or three central locations well before you try hot drops.
Bermuda rewards players who know their buildings. Well-known locations like Clock Tower, Peak, Mill and Factory pull a lot of players because loot is easy to find and fights start early. These are good for aggressive players and risky for everyone else.
How to approach it:
- Pick one landing area and stick with it for a few matches. Knowing which rooms and stairs lead where is worth more than hopping around.
- Loot fast, then check your minimap. Don't sit in a loot room while the zone closes.
- Open fields between buildings are where most players get caught. Move from cover to cover and use Gloo Wall when you must cross.
Common mistake:
Staying in your first building too long. Bermuda squads rotate quickly, and a late exit usually means fighting two teams at once.
Bermuda 2.0 (Bermuda Remastered) Guide
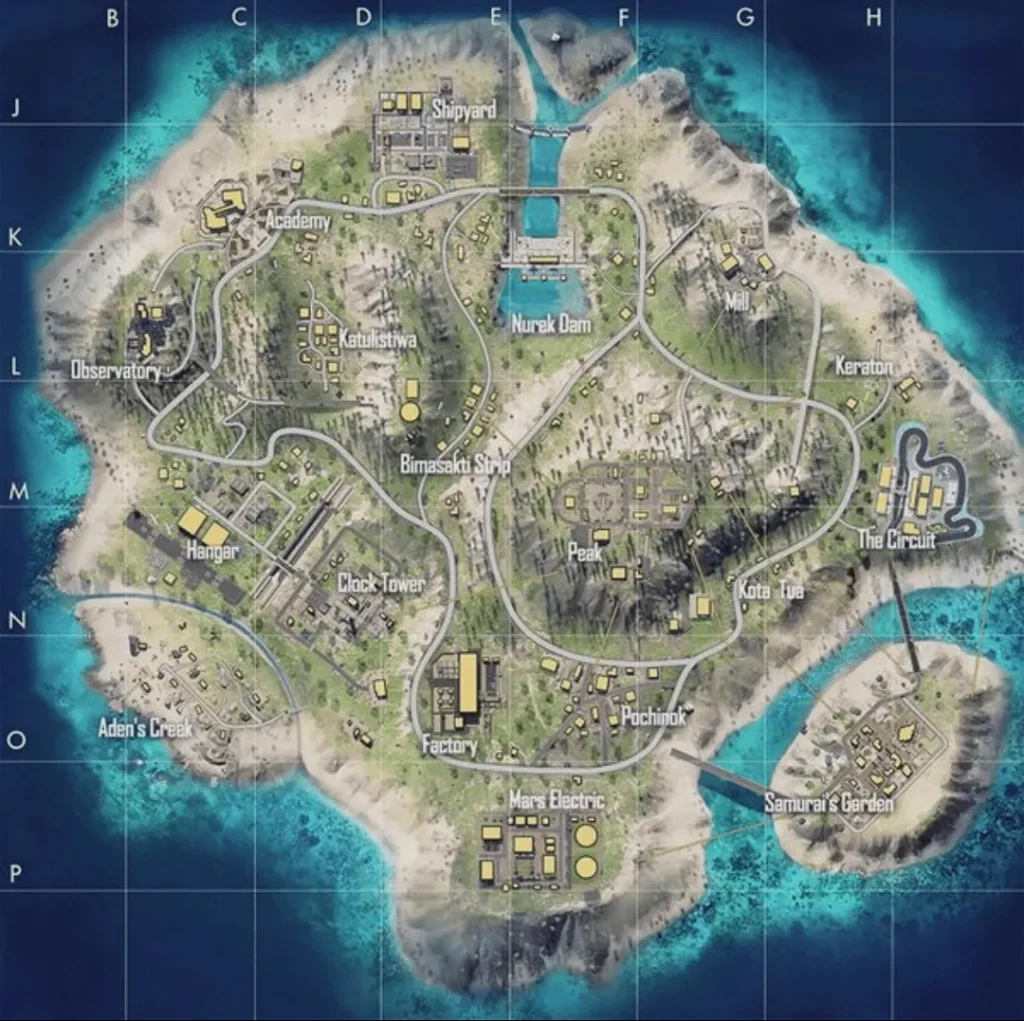
Bermuda 2.0 feels like the classic map with a new layout, so don’t rely on old habits. Relearn your landing spots.
Locations like Academy, Nurek Dam, Observatory and Samurai’s Garden give the map its own character. Central areas tend to draw more players, while outer areas give you room to loot before the first fight.
How to approach it:
- Choose between central and outer landing based on how ready you feel to fight. If your aim is warming up, go outer.
- Use buildings and terrain to break line of sight. Don't run straight lines across open ground.
- Plan your rotation before the first zone shrink, not after it.
Bermuda vs Bermuda 2.0:
The original suits players who like close-quarters fights around known buildings. The remastered map suits players who want to adapt, because its layout is fresher and fewer people have it memorized.
Kalahari Map Guide
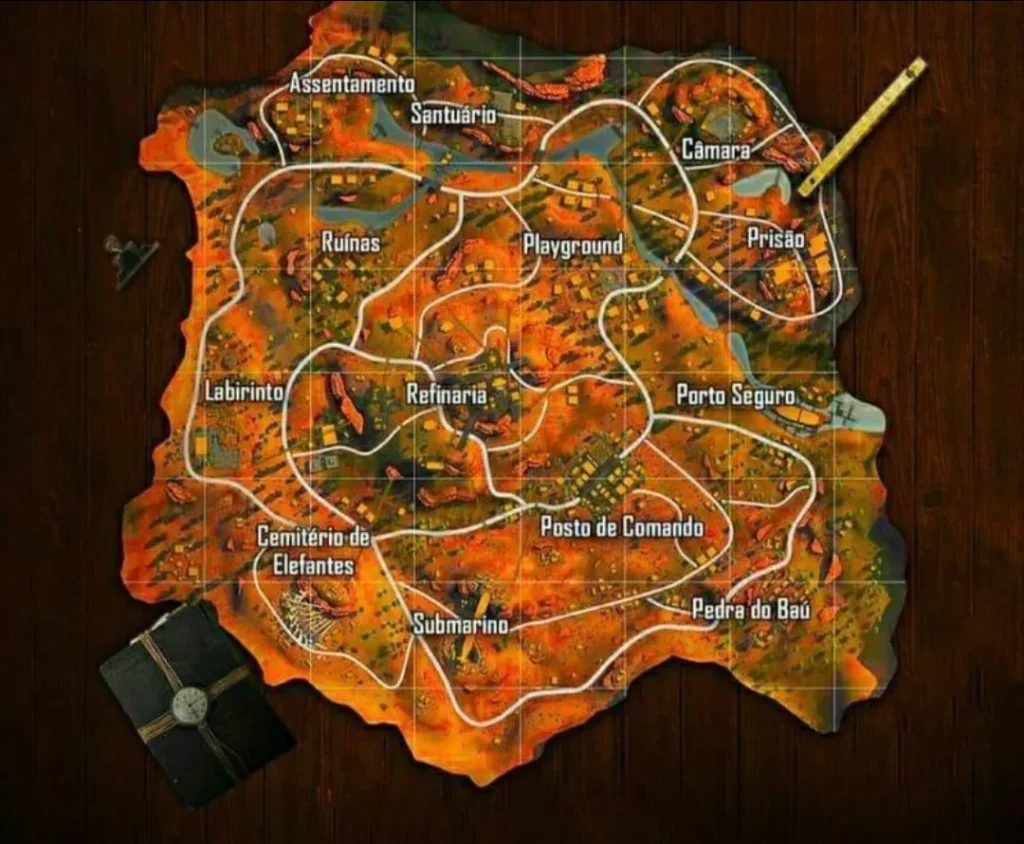
Kalahari is open and exposed, so your biggest weapon is cover discipline. Move rock to rock and building to building.
Desert maps make it easy to be seen from far away. Locations like Refinery, Command Post, Council Hall and Bayfront each offer different mixes of structure and openness.
How to approach it:
- Compare loot areas before you land. Dense areas mean quick gear but crowded fights.
- Cross exposed ground only when you have to. If you can take a slightly longer path behind rocks or buildings, take it.
- Don't rotate the same way every match. Predictable paths get you third-partied.
Common mistake:
Standing on high ground with nothing around you. Height helps only if you can also leave safely.
Purgatory Map Guide
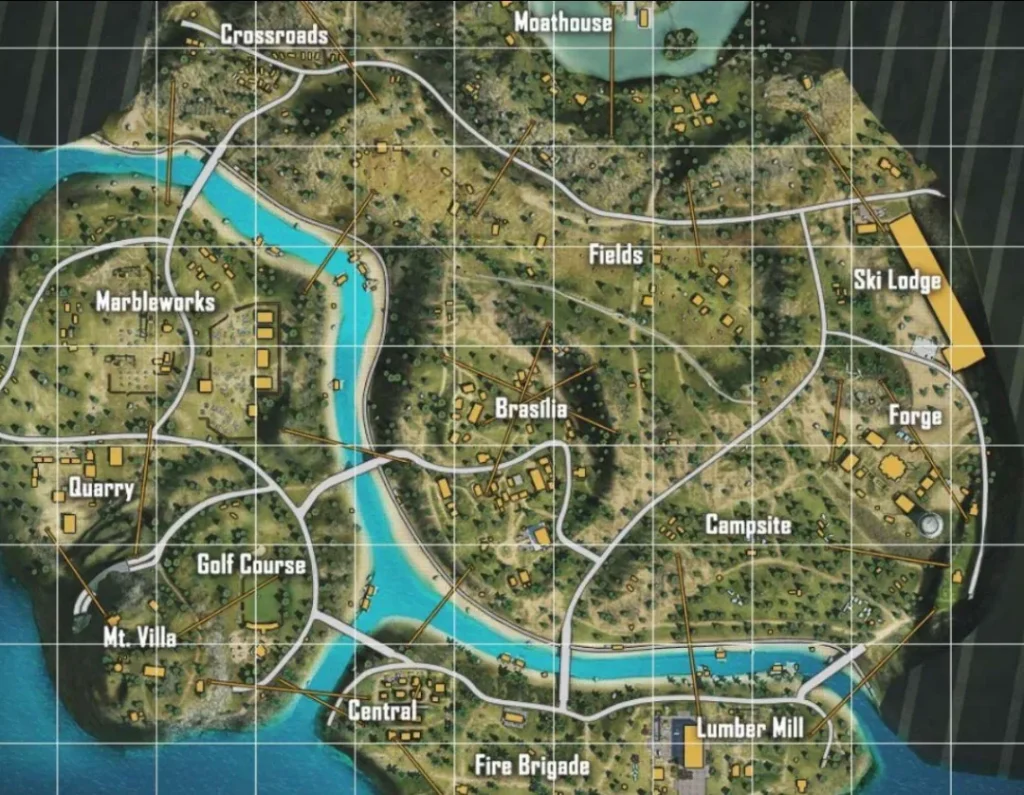
On Purgatory, plan your river and bridge crossings early. Crossings are where players get stuck, sniped or caught.
The map’s mix of water and wide land makes route choice a big deal. Areas like Central, Forge, Ski Lodge and Lumber Mill, along with Golf Course, Mt. Vilia and Moathouse, give you plenty of options.
How to approach it:
- Pick a landing area based on where the safe zone might push you. A good loot spot on the wrong side of a river can cost you the match.
- Know your connecting routes before you need them.
- Don't leave for the zone at the last second. Late rotations on this map often end at a choke point full of other squads.
Common mistake:
Crossing a bridge alone and in plain view. Bridges are predictable, and smart players watch them.
Alpine Map Guide
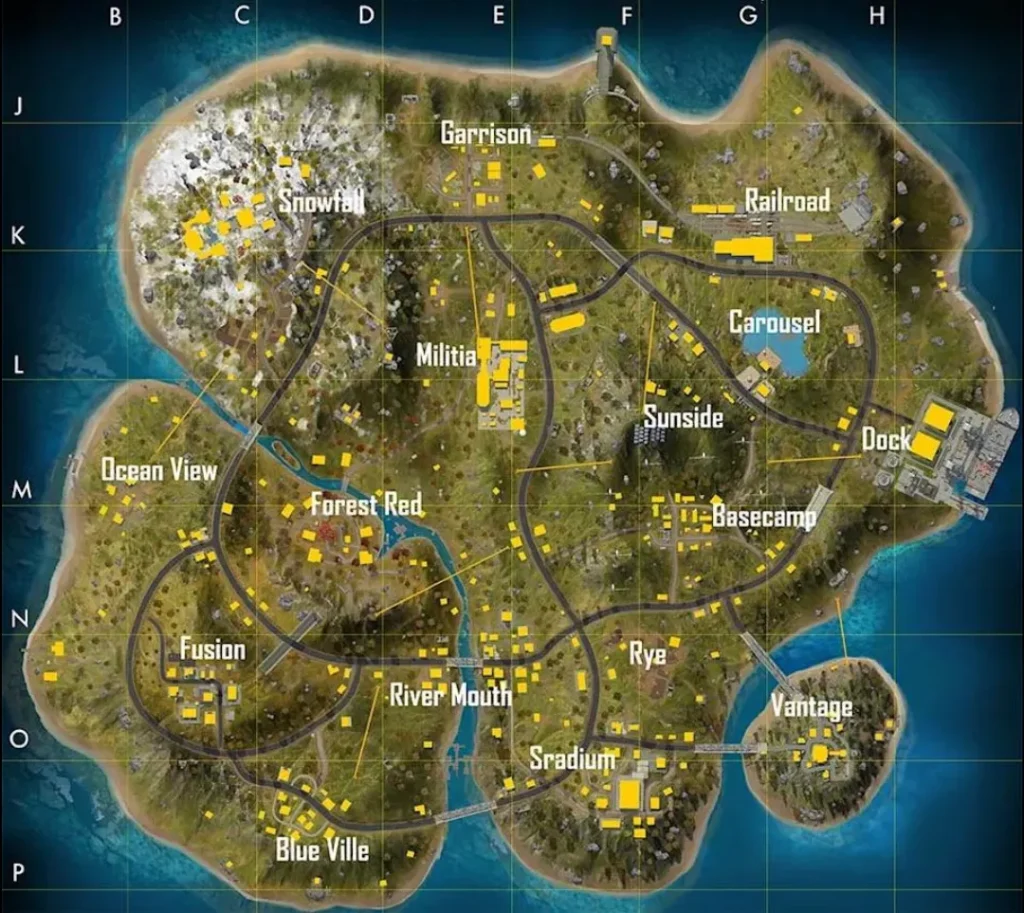
Alpine changes how you move as elevation and terrain change, so choose a landing area with nearby cover and think about height before every fight.
Locations such as Snowfall, Vantage, Railroad and River Mouth each play differently, and Dock and Fusion are worth checking when you want to judge a starting position.
How to approach it:
- Plan your rotation before the first zone shrink, not after it.
- Use elevated terrain to scout, but don't stay on top once you've seen what you needed.
- Moving between developed areas and open stretches is the risky part. Pause at the edge, scan, then go.
Common mistake:
Treating every hill as a good position. A hill with no cover behind it is just a spotlight.
NeXTerra Map Guide
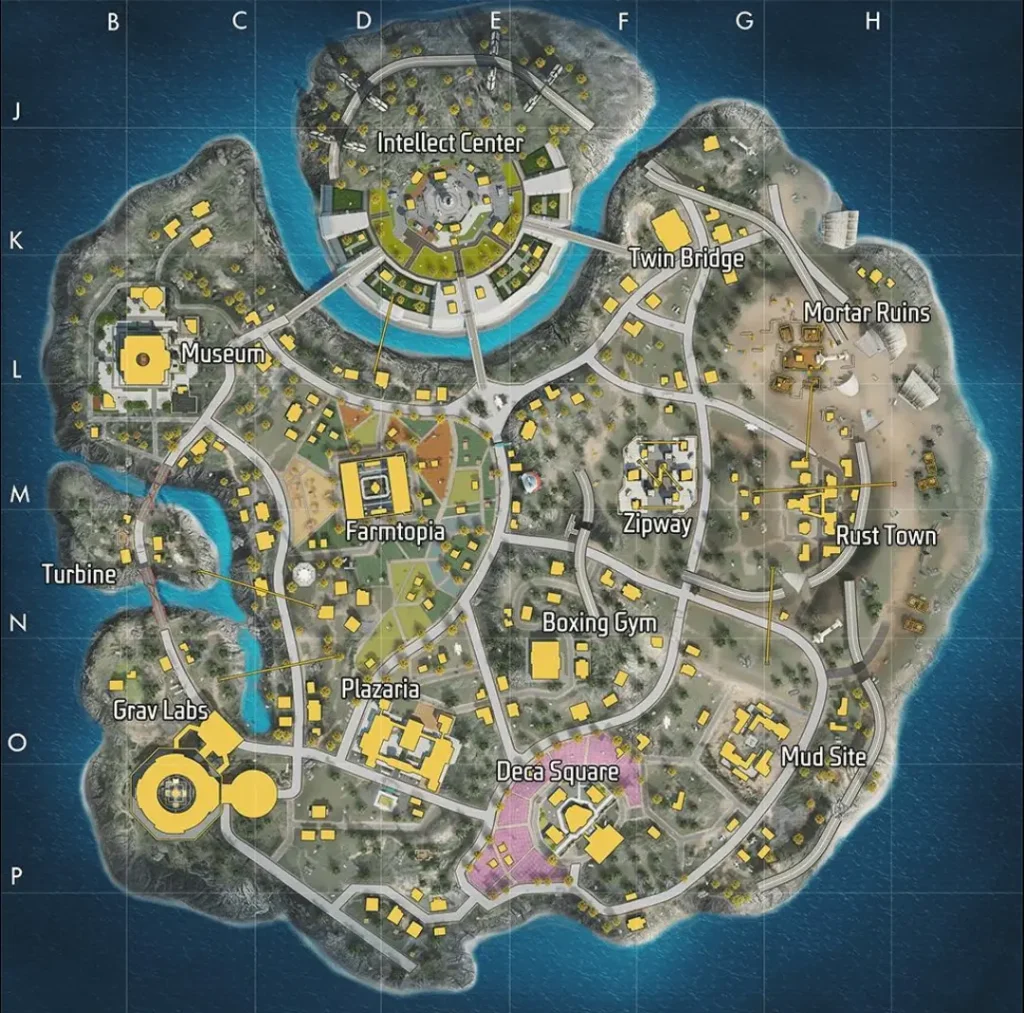
NeXTerra is a map of connected structures, so the winning habit is to identify cover before you enter a new area.
With places like Intellect Center, Twin Bridge, Museum, Mortar Ruins, Farmtopia, Rust Town, Grav Labs, Zipway, Deca Square and Mud Site, the map has a lot of variety and a lot of ways to get surprised.
How to approach it:
- Before you step into a new area, ask yourself where you'd go if someone appeared on your left.
- Pick routes between structures that give you cover, even if they're a bit longer.
- If a route turns risky, reposition early. Don't push forward just because you already committed.
Common mistake:
Getting so focused on one structure that you ignore the approaches around it.
Solara Map Guide
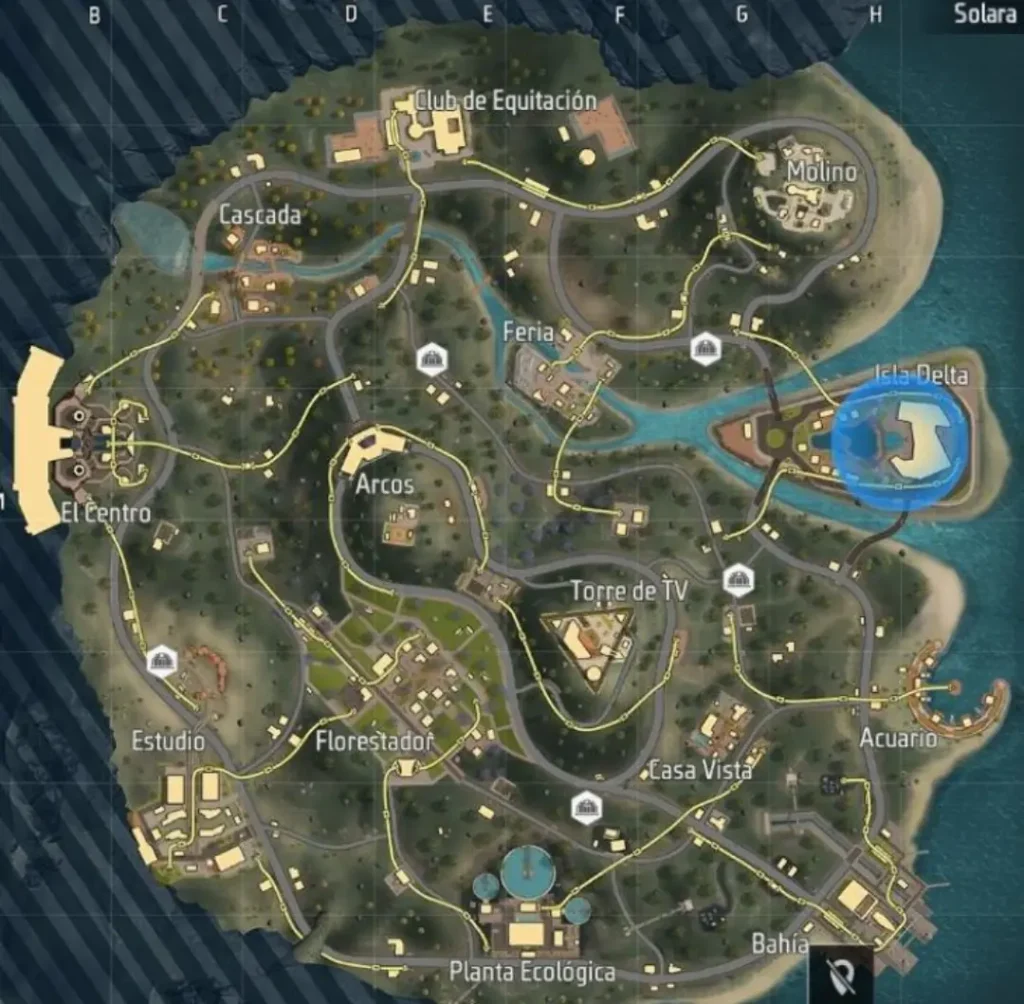
On Solara, the slide-track system and coastal layout are the main stories. Learn how routes connect before you decide between central and coastal landings.
Key locations include The Hub, Waterfall, Riders Club, Windmill, Archway, Funfair, Delta Isle, Bloomtown, TV Tower, Studio, Eco Drain and Casa Vista. Aquarium and Bayside shape the coastal routes.
How to approach it:
- Central areas offer more variety but also more traffic. Coastal areas can feel calmer and more route-based.
- Plan movement around the slide tracks. They can speed you up, but also make you easier to predict.
- Choose your area based on where the zone could go, not just where loot looks good.
Common mistake:
Using the same fast route every time. If opponents know where you’ll appear, they’ll wait for you.
How to Evaluate Loot Areas on Every Map
Good loot is only good if you can leave with it. Before you commit to an area, check:
- How exposed is it from outside?
- How many entrances does it have?
- How quickly can you reach the next piece of cover?
Loot until you have what you need for the next rotation, then go. Chasing a perfect kit is how players get caught still looting.
Safe Route vs Risky Route
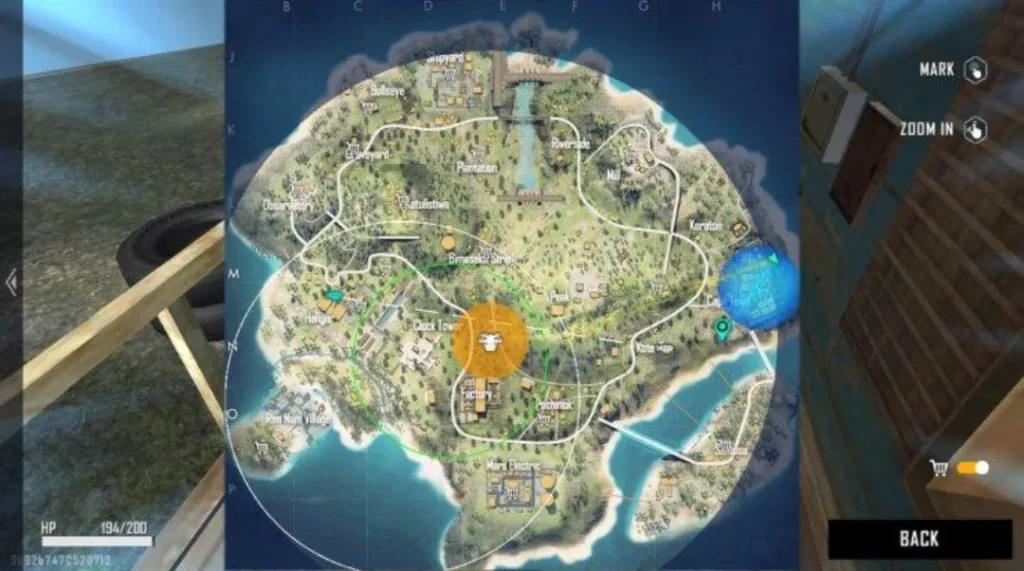
A direct route is faster. A covered route is safer. If the zone isn’t close, I’d almost always take the covered one. If time is tight, take the direct route but have a Gloo Wall ready and move in short bursts.
A Simple Framework: Position, Information, Resources, Exit
Run this check whenever you’re about to move:
- Position: Can I move with enough cover?
- Information: What did the minimap and surroundings tell me?
- Resources: Am I ready for the next fight, with ammo, healing and utilities?
- Exit: If this route goes bad, where do I go?
If you can’t answer one of these, slow down for a moment.
How to Avoid Unnecessary Early Fights
Early fights are usually a landing problem. If many players drop near you, you’ll fight whether you want to or not. Land away from the crowd, check your surroundings before you step out, and avoid getting caught between two approaches. If an area gets too hot, reposition instead of forcing it.
How to Improve Your Booyah Chances
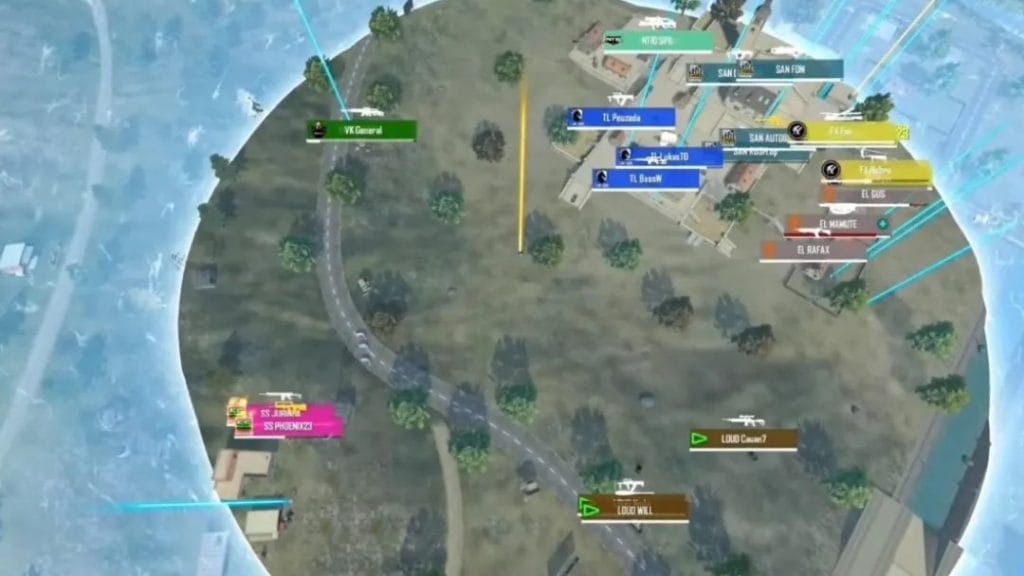
Build a plan from landing to final zone: where you land, where you loot, when you leave, how you rotate. After each match, ask one question: where did I lose the most time or health? The answer is usually the same mistake repeating, and fixing it helps more than any new trick.
No map guide can guarantee a Booyah every match. Fights, zones and luck vary. The goal is to make better decisions more often.
Frequently Asked Questions (FAQ)
How many maps are covered here?
Seven: Bermuda, Bermuda 2.0, Kalahari, Purgatory, Alpine, NeXTerra and Solara.
What's the difference between Bermuda and Bermuda Remastered?
The remastered version has a redesigned layout and updated locations, so old habits don’t always apply.
Which map is best for beginners?
Bermuda, because it’s familiar and its fights are easier to read.
Why are some maps missing from my game mode?
Availability depends on your version, region and mode. Check the in-game selection.
How do I avoid getting trapped during a rotation?
Leave earlier than you think you need to, use covered routes, and keep a Gloo Wall ready.
Can any guide guarantee Booyah?
No. A good guide improves your decisions, not your luck.
What to Do Next
Pick one map, one landing area, and one exit route. Play it for five matches and notice what changes. Then try a second map using the same Position, Information, Resources, Exit check.